Ink to Paper :: October Release :: Day Three
Happy Sunday, friends! It's Day Three of the Ink to Paper October release and it's all about gift cards today. Well, it's all about versatility, to be more accurate. With gift card-giving in mind, as well as tags, cards, and shakers, we bring you the Snowman and Snow Globe Go-To Gift Card Holders. I hope you like them (since I designed them!)...

We tried to cover a few bases with these, from making sure they fit on A2 cards, bringing you 2 different sizes with each die collection, allowing for the larger one to be compatible with a gift card slider, and even giving you the ability to create shaker cards and tags with them. There was more than a little effort involved, that's for sure! I'll share what I've created with the Snowman first, and then move on to the Snow Globe.

With so many options, it was hard to choose what to make first, but I decided to go for a gift card holder on a card. I started with a base of Hibiscus Burst, stamping and embossing some mini white snowflakes around the edges--those are from It's a Sign: Holiday Sentiments. Next, I cut out the large snowman from white card stock.

You'll find a single cutting line die with which you can create a slit in the body of the snowman to tuck the slider down behind it. (The slider is sold separately because it works with these two collections and there will be more on the way that it will also work with--spoiler alert!!)

Out of Mint Julep Bitty Big striped paper, I cut some pieces for the scarf--2 for the muff part that goes around the neck and one for the tail that hangs down. You can hide the top of the card slider by strategically adhering the muffs over it, just be careful not to adhere them to the actual snowman or the slider won't come out!

I stamped 'there must be some magic inside' on the snowman's body and embossed it in gold. There's a mini stamp set that you can purchase with a couple of fitting sentiments and some accessories like eyes, a carrot nose, and mouth. Items like the scarf pieces, the carrot nose, top hat, eyes and mouth all come in two sizes--to fit the large or the small snowman. Here, I stamped black eyes, a hidden black mouth, and an Orange Zest nose. My recipient will see the little mouth after they remove the slider.

Finally, I made a top hat from Luxe Gold card stock, embellishing it with some holly leaves, which are from yesterday's Framing Florals: Christmas die set. The pink berry is just made from a 1/4" hole punch. I can't wait to make a few more gifties with this set!
Supplies:
Stamps: Go-To Gift Card Holder: Snowman Accessories, It's a Sign: Holiday Sentiments
Ink: Orange Zest, True Black, Watermark
Paper: Hibiscus Burst, White, Luxe Gold, Mint Julep Bitty Big
Dies: Go-To Gift Card Holder: Snowman, Go-To Gift Card Slider, Framing Florals: Christmas
Other: 1/4" hole punch, white & gold embossing powders

The other Go-To Gift Card Holder die collection is the Snow Globe. However, what's really awesome about the snow globes is that you can also make an ornament with them, too! There are dies to put a base on a snow globe or a top and hook on an ornament. Again, each design comes in 2 sizes and they are sized to fit on an A2 card with the larger size able to house a gift card.
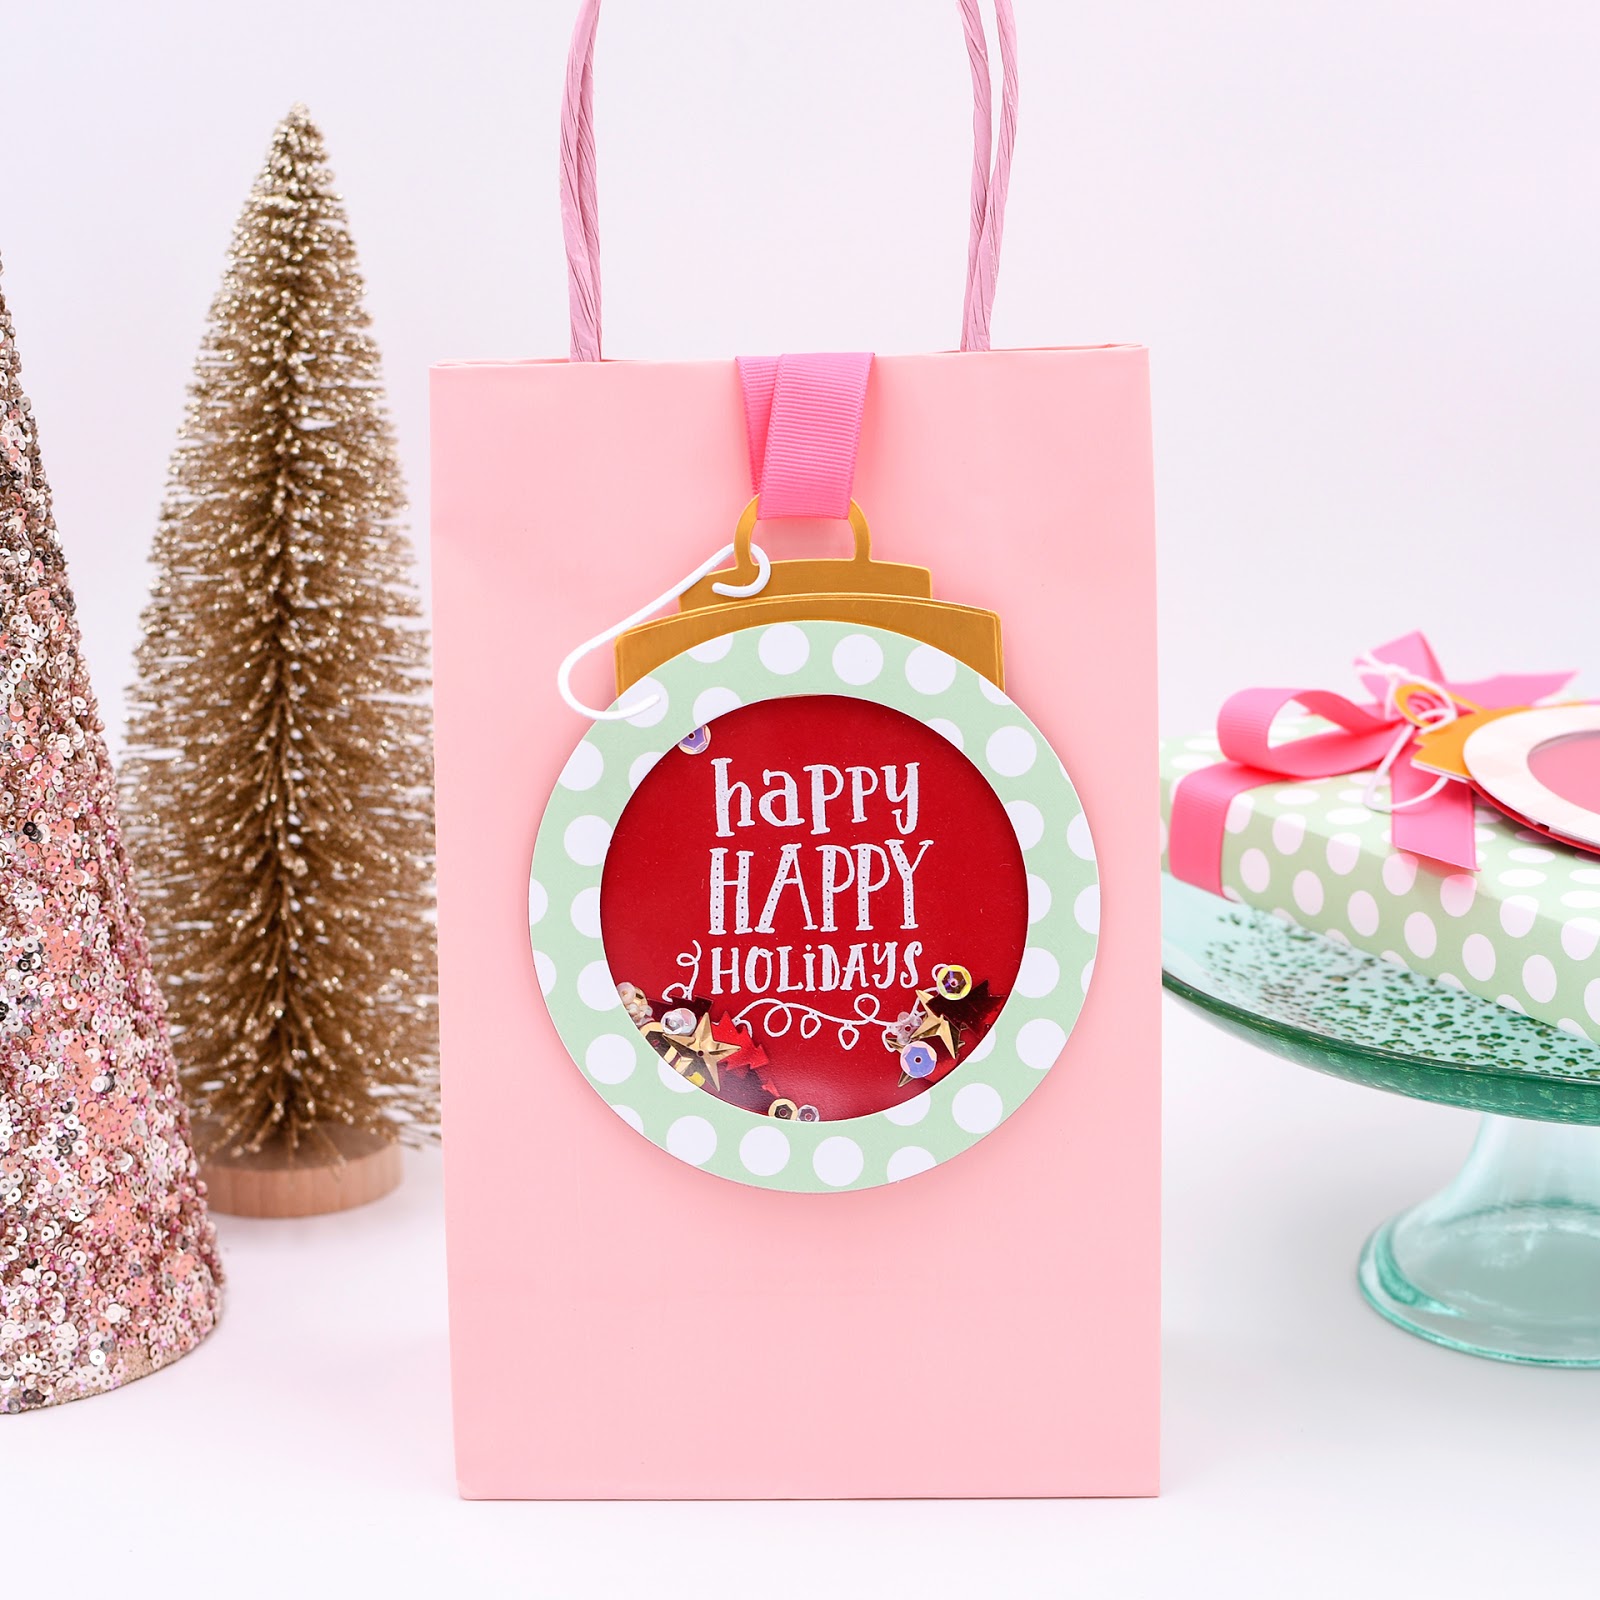
I created 2 shaker ornament tags to decorate packages. I cut out 2 large Pure Poppy whole circles first, then centered the smaller circle inside the larger one to cut out 2 frames from patterned paper. (I also cut 2 frames from white cardstock on which to glue those frames; it's sturdier that way.) Then I cut out a large whole circle from acetate and adhered it to the frames.

This die set coordinates really well with the cut Happy Happy Holidays sentiment stamps (I can't take the credit for designing those), so I wanted to use them on the interior of my tags. I chose two messages and embossed them on the red card stock. The dies that make the top of the ornament are cut from Luxe Gold card stock, and I adhered them to the red ball.

After positioning foam tape around the backside of the frame, I filled it with a holiday sequin mix and attached the red circle. The silver die cut hook may not exactly hold if you try and hang the ornament from a package, but it's a cute final touch.
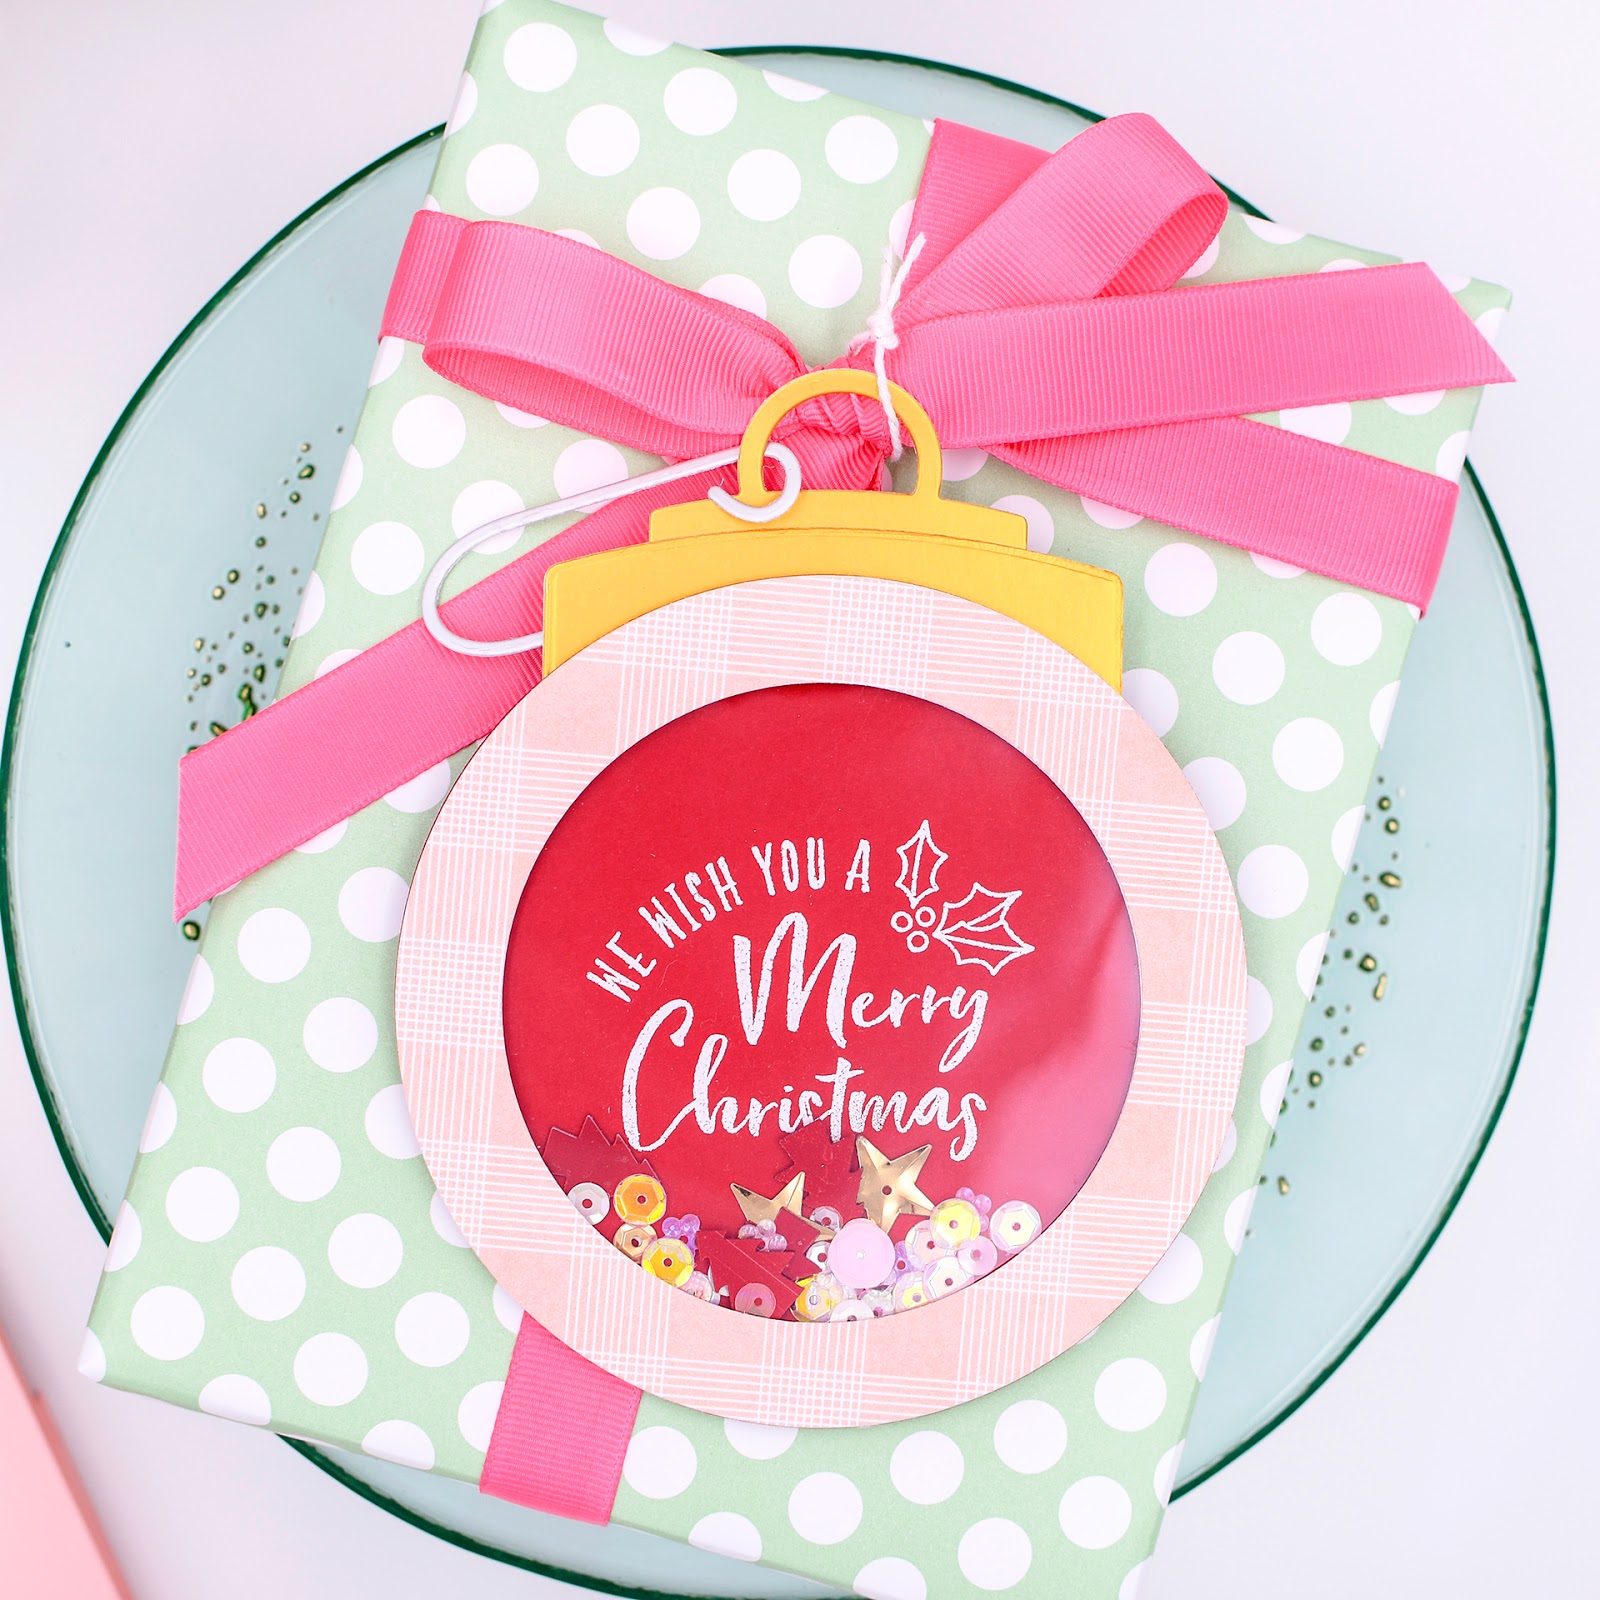
You can either use these gift toppers on a paper-wrapped box or attach them to a gift bag. You can use so many different sentiments with this set, and if you want to create a proper decorative ornament, some of the images in this month's release would be perfect for that!
Supplies:
Stamps: Happy Happy Holidays
Ink: Watermark
Paper: Pure Poppy, white, Luxe Gold, Luxe Silver, Mint Julep & Sweet Blush Bitty Big
Dies: Go-To Gift Card Holder: Snow Globe
Other: Hibiscus Burst grosgrain ribbon, acetate, foam tape, white embossing powder, sequins
I hope you're excited for these gift card holders, because I am! You can do so many different things with them, so if you don't want to use them for gift cards, that's totally fine, too! I'll see you back here tomorrow for one more look at new products before it all officially becomes available on the 15th at 10pm EST. I hope you're enjoying your weekend--thanks for spending a little of it with me!
We tried to cover a few bases with these, from making sure they fit on A2 cards, bringing you 2 different sizes with each die collection, allowing for the larger one to be compatible with a gift card slider, and even giving you the ability to create shaker cards and tags with them. There was more than a little effort involved, that's for sure! I'll share what I've created with the Snowman first, and then move on to the Snow Globe.
With so many options, it was hard to choose what to make first, but I decided to go for a gift card holder on a card. I started with a base of Hibiscus Burst, stamping and embossing some mini white snowflakes around the edges--those are from It's a Sign: Holiday Sentiments. Next, I cut out the large snowman from white card stock.
You'll find a single cutting line die with which you can create a slit in the body of the snowman to tuck the slider down behind it. (The slider is sold separately because it works with these two collections and there will be more on the way that it will also work with--spoiler alert!!)
I stamped 'there must be some magic inside' on the snowman's body and embossed it in gold. There's a mini stamp set that you can purchase with a couple of fitting sentiments and some accessories like eyes, a carrot nose, and mouth. Items like the scarf pieces, the carrot nose, top hat, eyes and mouth all come in two sizes--to fit the large or the small snowman. Here, I stamped black eyes, a hidden black mouth, and an Orange Zest nose. My recipient will see the little mouth after they remove the slider.
Finally, I made a top hat from Luxe Gold card stock, embellishing it with some holly leaves, which are from yesterday's Framing Florals: Christmas die set. The pink berry is just made from a 1/4" hole punch. I can't wait to make a few more gifties with this set!
Supplies:
Stamps: Go-To Gift Card Holder: Snowman Accessories, It's a Sign: Holiday Sentiments
Ink: Orange Zest, True Black, Watermark
Paper: Hibiscus Burst, White, Luxe Gold, Mint Julep Bitty Big
Dies: Go-To Gift Card Holder: Snowman, Go-To Gift Card Slider, Framing Florals: Christmas
Other: 1/4" hole punch, white & gold embossing powders
The other Go-To Gift Card Holder die collection is the Snow Globe. However, what's really awesome about the snow globes is that you can also make an ornament with them, too! There are dies to put a base on a snow globe or a top and hook on an ornament. Again, each design comes in 2 sizes and they are sized to fit on an A2 card with the larger size able to house a gift card.
I created 2 shaker ornament tags to decorate packages. I cut out 2 large Pure Poppy whole circles first, then centered the smaller circle inside the larger one to cut out 2 frames from patterned paper. (I also cut 2 frames from white cardstock on which to glue those frames; it's sturdier that way.) Then I cut out a large whole circle from acetate and adhered it to the frames.
This die set coordinates really well with the cut Happy Happy Holidays sentiment stamps (I can't take the credit for designing those), so I wanted to use them on the interior of my tags. I chose two messages and embossed them on the red card stock. The dies that make the top of the ornament are cut from Luxe Gold card stock, and I adhered them to the red ball.
You can either use these gift toppers on a paper-wrapped box or attach them to a gift bag. You can use so many different sentiments with this set, and if you want to create a proper decorative ornament, some of the images in this month's release would be perfect for that!
Supplies:
Stamps: Happy Happy Holidays
Ink: Watermark
Paper: Pure Poppy, white, Luxe Gold, Luxe Silver, Mint Julep & Sweet Blush Bitty Big
Dies: Go-To Gift Card Holder: Snow Globe
Other: Hibiscus Burst grosgrain ribbon, acetate, foam tape, white embossing powder, sequins
I hope you're excited for these gift card holders, because I am! You can do so many different things with them, so if you don't want to use them for gift cards, that's totally fine, too! I'll see you back here tomorrow for one more look at new products before it all officially becomes available on the 15th at 10pm EST. I hope you're enjoying your weekend--thanks for spending a little of it with me!
Wow - absolutely adorable projects and those gift card holders are genius!! Love love love it, Rebecca!!
ReplyDelete