Ink to Paper :: DT Tips :: DIY Die Cut Wreaths
Hands up if you're happy it's Friday! It happens to be my turn for an Ink to Paper Design Team Tips post today, so I'm happy you've stopped by for that. I've got a fun DIY project for you, and it's an easy one, so no stress!
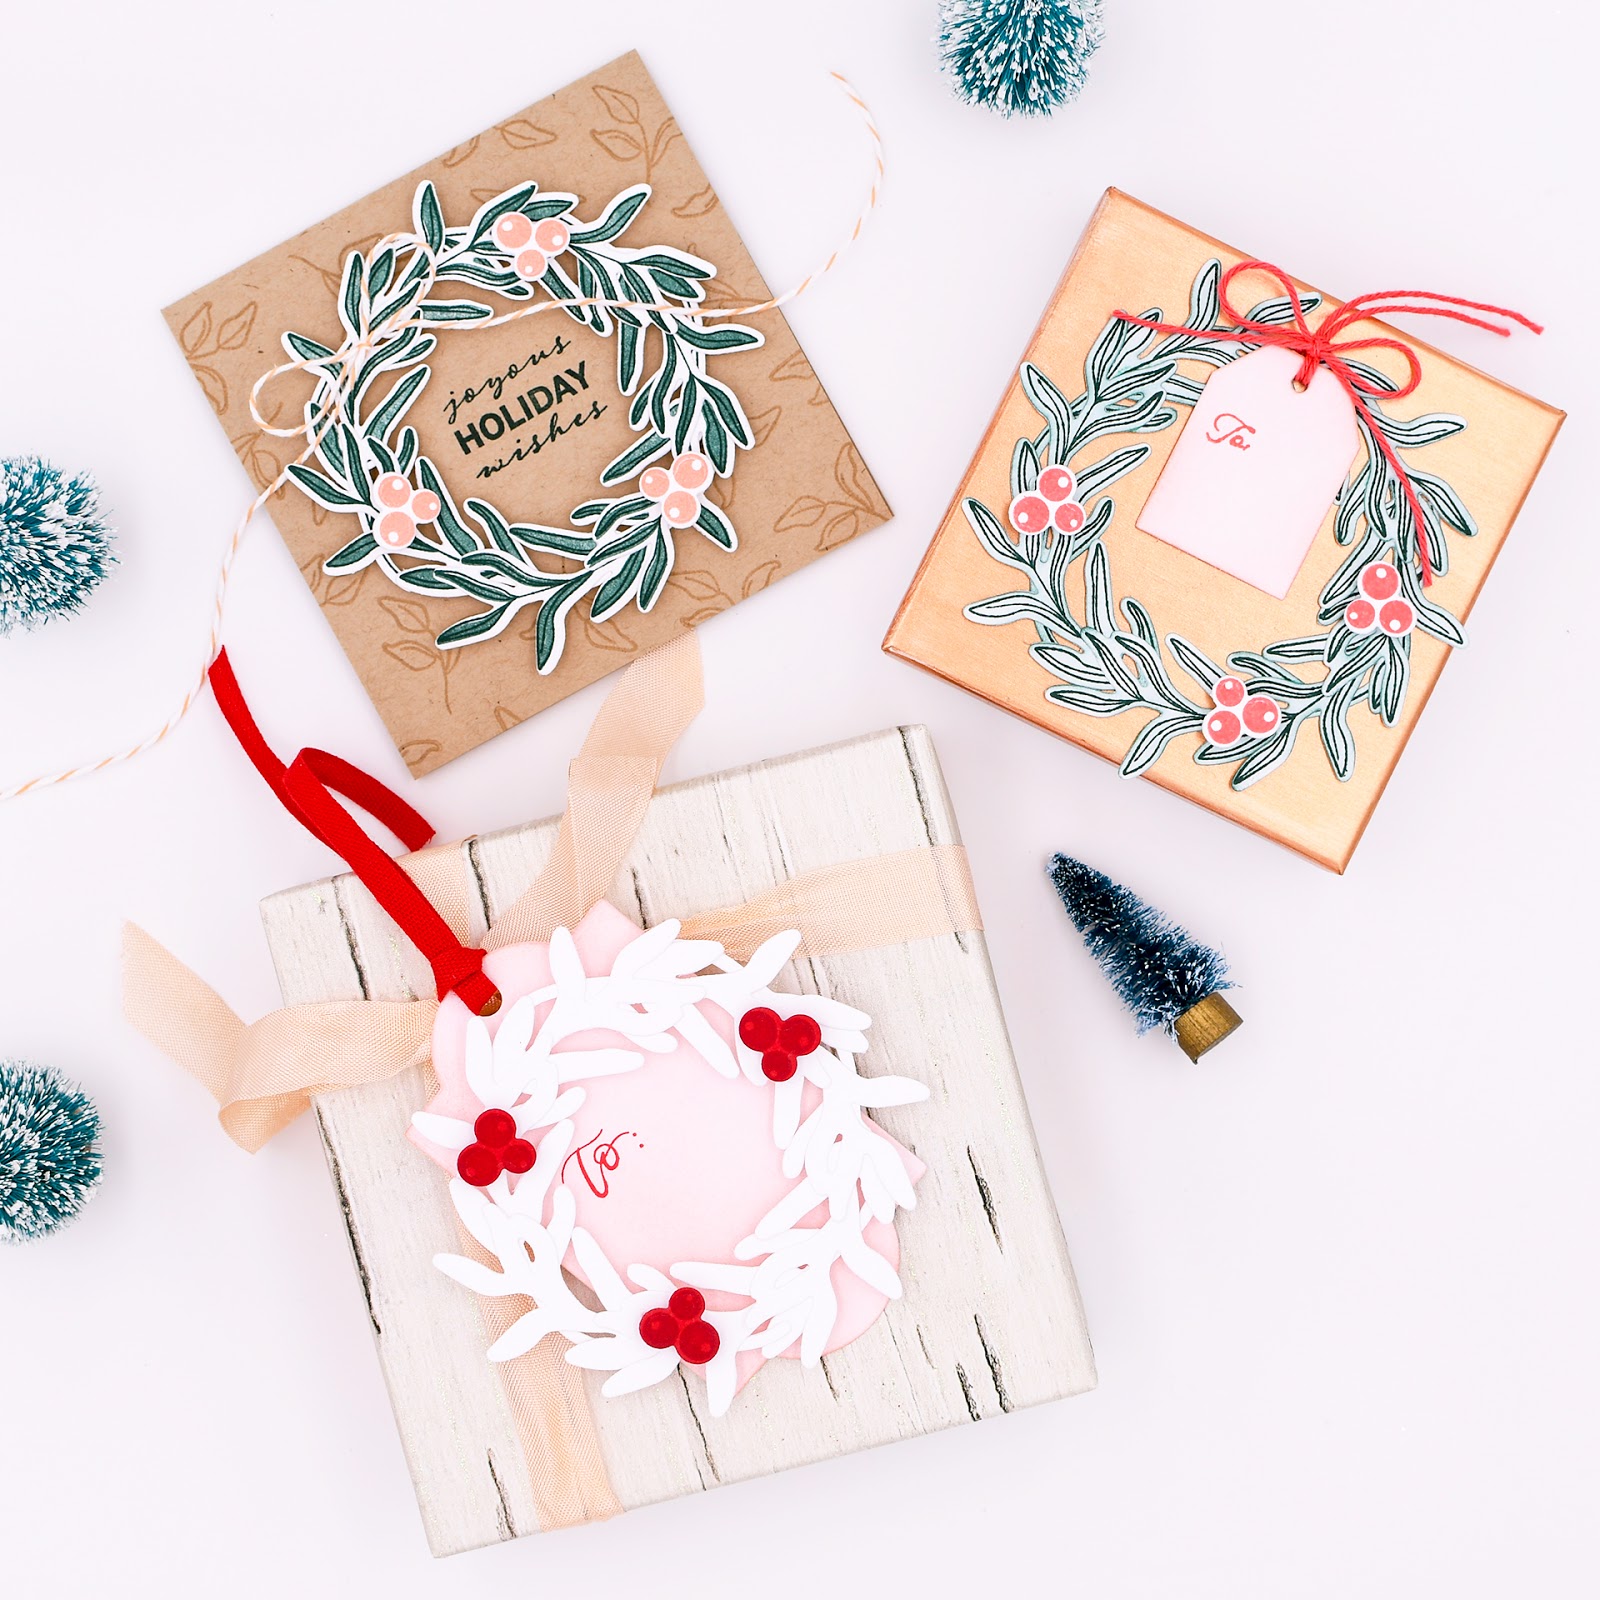
I've been using a lot of wreath images this year for my holiday cards and tags. In its last releases, Ink to Paper has put out some beautiful stamps with which to create them. I thought it might be fun to try and make my own version, too, and after picking through all of the sets I have, I decided that a leafy branch die from Framing Florals was just perfect for the task! In today's DT Tips, I'll share how I've assembled the die cuts to create 3-dimensional wreaths for tags, cards, and gift toppers.

You can really approach this project however you like. I wanted to create a wreath I could use on a tag or a card, but you can make yours a little bigger if you'd rather. Assuming you have a die cutting machine, here's what else you'll need to start:

I made a few different kinds of finishes for my wreaths--a die cut wreath made from plain white cardstock; a stamped outline with ink blended coloring; and a straightforward stamped outline and stamped interior version. You can choose what you like best.

You'll need about 7 of these die cuts for a complete 3.5" circle; you can use more if you want bigger; if you want to go smaller, you might want to opt for a different image or you may get a funky-looking circle!

You'll want to play with positioning a bit before you start adhering the pieces together. It's the trickiest part of the whole process, but once you've got one complete, you can kind of use it as a template for any others you make after that. Mine overlap each other by roughly half of their bodies; this gives the wreath a fuller, layered look.

Now it's time to assemble! When it's complete, you can add some berries or bows like I did. I adhered the berries with small 3-D foam dots to give them some extra dimension, and when I adhered the wreath to the peach tag and kraft card, I also used foam adhesive.

I wanted mostly to make tags or package toppers with my wreaths and I've used the frame die from Framing Florals as the tag base. I brushed on some Melon Berry ink with a blending brush, then stamped 'to' in Pure Poppy in the interior of the wreath. A punched hole and some red ribbon finish the look and I love the way it turned out!

The wreath that's been stamped and ink blended I've used as a gift topper. I simply tied a tag to it and used a few mini glue dots to attach it to a gift box.

If tags and and packaging aren't your thing, that's okay! The wreath makes a lovely centerpiece on a card, too! I took a 4" square kraft card base, stamped a few small images of a coordinating leafy branch in subtle Watermark ink, added a festive message, and adhered the wreath.

I hope you think about giving this DIY a try! I have a feeling these will be adorning many of my Christmas packages this year!

Supplies:
Stamps: Framing Florals, It's a Sign: Christmas Bough, Just Sentiments: Be Merry, Just Sentiments: To & From Essentials
Ink: Pinefeather, Melon Berry, Berry Sorbet, Pure Poppy, Watermark
Paper: Classic Kraft, Pure Poppy, White
Dies: Framing Florals, It's a Sign: Christmas Bough, Tag Creations: Modern Gift Die
Other: twine, ribbon, ink blending brush, 3-D foam dots
I've been using a lot of wreath images this year for my holiday cards and tags. In its last releases, Ink to Paper has put out some beautiful stamps with which to create them. I thought it might be fun to try and make my own version, too, and after picking through all of the sets I have, I decided that a leafy branch die from Framing Florals was just perfect for the task! In today's DT Tips, I'll share how I've assembled the die cuts to create 3-dimensional wreaths for tags, cards, and gift toppers.
You can really approach this project however you like. I wanted to create a wreath I could use on a tag or a card, but you can make yours a little bigger if you'd rather. Assuming you have a die cutting machine, here's what else you'll need to start:
-A type of 'leafy branch' -- I chose mine from Framing Florals because I wanted a die cut with separated leaves, as opposed to a more outlined shape (you can see the difference in the dies below).
-Glue
-Stamps & ink (optional)
I made a few different kinds of finishes for my wreaths--a die cut wreath made from plain white cardstock; a stamped outline with ink blended coloring; and a straightforward stamped outline and stamped interior version. You can choose what you like best.
You'll need about 7 of these die cuts for a complete 3.5" circle; you can use more if you want bigger; if you want to go smaller, you might want to opt for a different image or you may get a funky-looking circle!
You'll want to play with positioning a bit before you start adhering the pieces together. It's the trickiest part of the whole process, but once you've got one complete, you can kind of use it as a template for any others you make after that. Mine overlap each other by roughly half of their bodies; this gives the wreath a fuller, layered look.
Now it's time to assemble! When it's complete, you can add some berries or bows like I did. I adhered the berries with small 3-D foam dots to give them some extra dimension, and when I adhered the wreath to the peach tag and kraft card, I also used foam adhesive.
I wanted mostly to make tags or package toppers with my wreaths and I've used the frame die from Framing Florals as the tag base. I brushed on some Melon Berry ink with a blending brush, then stamped 'to' in Pure Poppy in the interior of the wreath. A punched hole and some red ribbon finish the look and I love the way it turned out!
The wreath that's been stamped and ink blended I've used as a gift topper. I simply tied a tag to it and used a few mini glue dots to attach it to a gift box.
If tags and and packaging aren't your thing, that's okay! The wreath makes a lovely centerpiece on a card, too! I took a 4" square kraft card base, stamped a few small images of a coordinating leafy branch in subtle Watermark ink, added a festive message, and adhered the wreath.
I hope you think about giving this DIY a try! I have a feeling these will be adorning many of my Christmas packages this year!
Stamps: Framing Florals, It's a Sign: Christmas Bough, Just Sentiments: Be Merry, Just Sentiments: To & From Essentials
Ink: Pinefeather, Melon Berry, Berry Sorbet, Pure Poppy, Watermark
Paper: Classic Kraft, Pure Poppy, White
Dies: Framing Florals, It's a Sign: Christmas Bough, Tag Creations: Modern Gift Die
Other: twine, ribbon, ink blending brush, 3-D foam dots
Comments
Post a Comment
i do appreciate your comment!
~Rebecca