Ink to Paper :: February Release :: Day Four
Happy Valentine's Day!! It's that special time of the month when we start sneaking peeks at the Ink to Paper product releases! These new items are officially available for purchase on February 15th in the Ink to Paper shop.

I have 4 cards for the finale today and while 3 out of 4 of them feature lovely florals, I did manage to create something for the men, too! (They're so often overlooked, poor things ;)

There's a new Inside Greetings to debut, this one is for Get Well cards; there's an absolutely stunning floral die that is a must-have, and there's also a new Border Bling die, this time in a cool chain design (I can't take the credit for this one). There's a lot to see so let's get to it.

My first 3 cards are Get Well cards and feature both the Border Bling: Chain frame die and Inside Greetings: Get Well. They're all nice and colorful to inspire wellness and cheer for those who are under the weather.


A few handy tips:
1. Fill in chain link openings with the negative cuts from a different paper color.
2. To adhere the chain frame, back your paper with a sheet of double sided adhesive before die cutting. A thin, clear drying glue pen is another option.
3. Flip-flop your sentiments, and put the longer Inside Greeting on the outside and the shorter 'thinking of you' on the inside.

Supplies:
Stamps: Inside Greetings: Get Well, Blossoming Branches, Essential Sentiments
Ink: Sweet Blush, Summer Sunrise, Limeade Ice, Classic Kraft
Paper: Ripe Avocado, Raspberry Fizz, polka dot patterned paper (American Crafts)
Dies: Border Bling: Chain, Blossoming Branches, Essential Sentiments

Men get sick, too! With all the beautiful floral sets releasing this month, it's easy to forget the guys and focus on the ladies. The quotes from "Inside Greetings: Get Well" are gender neutral, so don't overlook making a Get Well Soon card for the males in your life. The Chain frame makes a fantastic masculine design, too, and I made oranges out of lemon slices for a little extra pop of orange in the color palette.

A few handy tips:
1. Frame long messages when used on card fronts to define them
2. To make the chain design stand out, back it with contrasting cardstock
3. Double up on foam adhesive to add layers of dimension

Supplies:
Stamps: Inside Greetings: Get Well, Blossoming Branches, It's A Sign: Wood Frames
Ink: Limeade Ice, True Black
Paper: Orange Zest, Melon Berry, Smokey Shadow, White cardstock; Dark Indigo Bitty Big
Dies: Border Bling: Chain, Blossoming Branches, Cup of Love, It's A Sign: Wood Frames

A bouquet of flowers is sure to cheer up anyone who may be feeling under the weather and last month's Birthday Bouquet will do just the trick! It's a nice centerpiece for the Bright Buttercup Chain frame, and bright colors are meant to bring sunshine and cheer to someone who needs it. There's even a cute 'Get well' tag accompanying the bouquet and I've carried the design over to the inside of the card, as well.


1. The Chain border frames the card interior
2. Bring in the same colors from the outside to the inside for continuity
3. Use the same floral die cuts to decorate the inside but skip the dimensional adhesive

Supplies:
Stamps: Inside Greetings: Get Well, Birthday Bouquet, Cup of Love
Ink: Pure Poppy, Pale Peony, Aqua Mist
Paper: Bright Buttercup, White, polka dot patterned paper (American Crafts)
Dies: Border Bling: Chain, Birthday Bouquet, Cup of Love

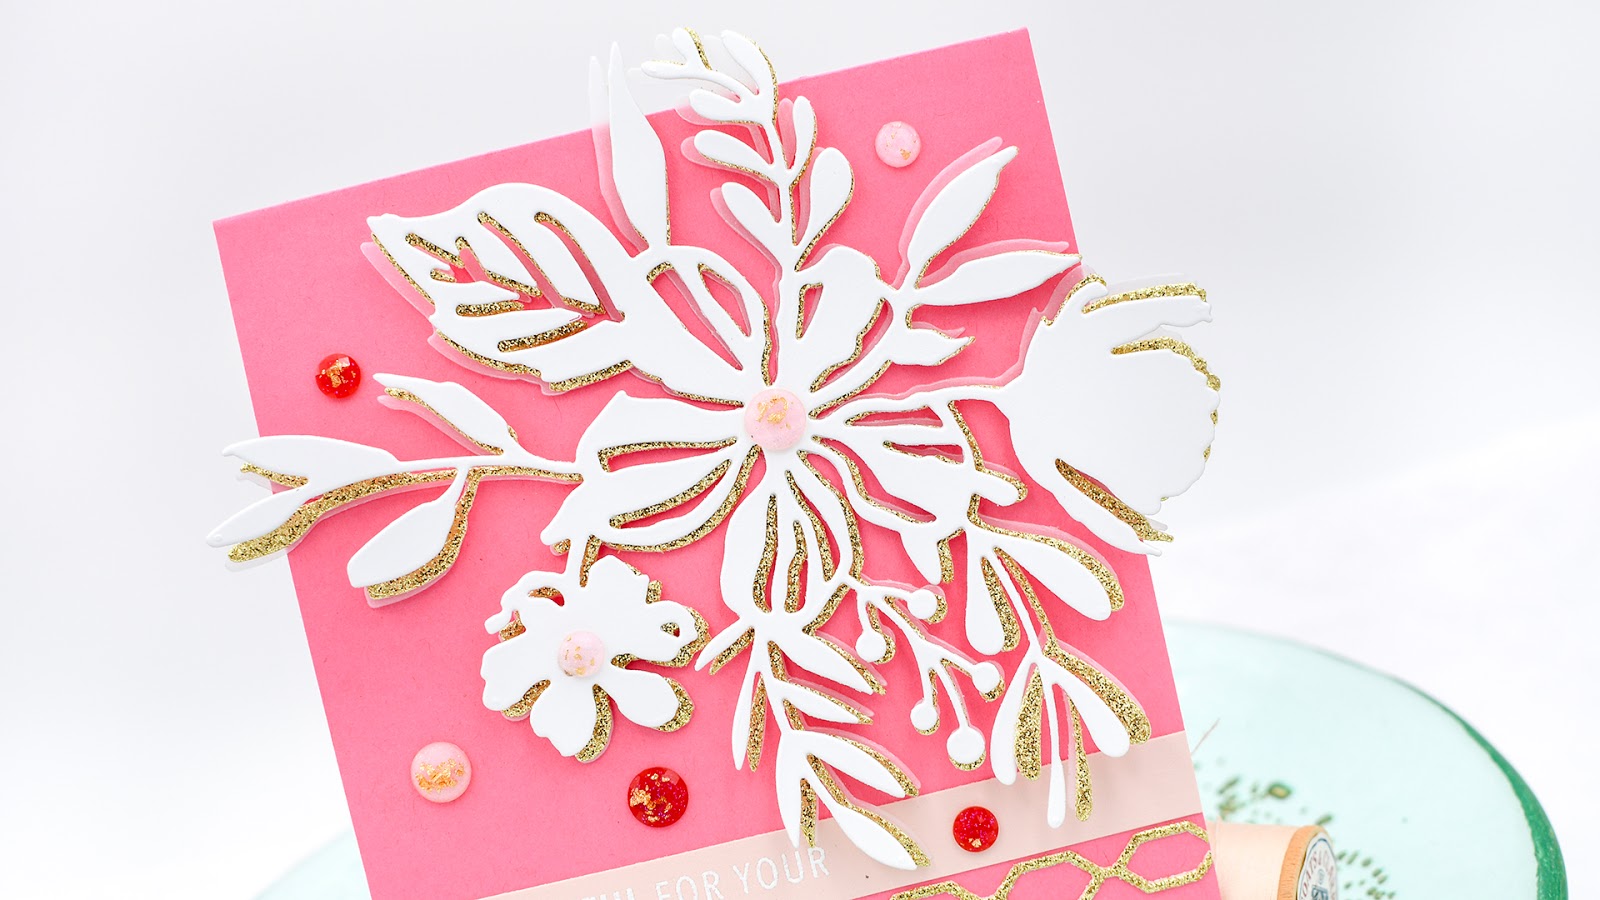
My last card features just a piece of the Chain frame with the Bouquet Backdrop die--isn't that bouquet amazing?! I've kept the bouquet really simple; you might feel like you need to watercolor it, piece it together in different cardstocks, or that you must do very fancy techniques in order to enjoy the die cut. But you don't! You certainly may and you will love it either way, but it can simply be cut out and used just the way it is. I cut it out of plain white cardstock, vellum, and gold glitter paper, then layered them on top of each other, slightly offset, and I love the result.


Stamps: Bold Blooms
Ink: Watermark
Paper: Hibiscus Burst, White, Gold Glitter, vellum
Dies: Bouquet Backdrop, Border Bling: Chain
Other: white embossing powder, gold-flecked gems
Comments
Post a Comment
i do appreciate your comment!
~Rebecca