pti :: quick stitch kits :: design-a-softie
Hello, hello! It's time for another Quick Stitch Kit release from Papertry Ink! Have you got your preferred beverage within reach? All right then, let's take a peek!
The second Quick Stitch Kit will be released on May 1st and it is entitled "Design-A-Softie". This is one collection of tools and stamps that you will turn to again and again to make heirloom quality gifts with heart. Everything you need to make customized softies will be right at your fingertips! Besides the basic softie body parts, there are dies for different facial expressions, eyes, ears and even trendy accessories! You will be able to create special one-of-a-kind stuffed animals according to a child's favorites colors, interests and personality! Think of this as your own personal build-a-bear, just on a more affordable level! Get your kit tomorrow night so you can get a head start on holiday gifts!
Design-A-Softie Kit Contents:
Custom tote bag
Design-A-Softie mini stamp set + index label
Softie die collection
Softie Ears die collection
Softie Expressions die collection
Softie Glasses & Mustaches die collection
Softie Kerchief die collection
Softie Patches die collection
Softie Collar & Tie die collection
Softie Exclusives die collection
Custom button mix (50 buttons total)
(4) Iron-on 8-1/2" x 11" Transfer sheets
(1) pdf download with full instructions
The total retail cost of the "Design-A-Softie" Kit is $105. There will be a limited number of these exclusive kits available, so be sure to get yours while you can! Some individual items will be available for sale at a later date. The "Design-A-Softie" Kit will be available for sale beginning May 1st at 10pm EST, only at Papertrey Ink. Read all the details on Nichole's blog or contact Customer Service with any questions.

When the email went out to the Quick Stitch Team last month about this month's kit from Papertrey Ink, I was really excited that I was going to have the chance to make something for my kids. I spend time every single day crafting but when it's all said and done, it's a rarity that I've made something for them. So this was going to be a treat!

I knew even before receiving the kit's contents that I was making a puppy for Gus and a bunny for Nemy. Then it was time to choose the colors--my favorite part of all of these QSK projects, given that the felts are so gorgeously saturated. I tried to let Gus choose his own colors but he picked Raspberry Fizz and Tropical Teal so I intervened and guided him toward Ocean Tides and Smokey Shadow. That said, I see making another one in Gus's preferred hues in the near future (and I'll be sure to share the finished product)!

I decided on Harvest Gold and Melon Berry for the bunny, based on some fabric I had and an irresistible little bow given to me by a dear friend. I nervously but desperately wanted to try out Erin Lincoln's iron-on-transfer-paper-to-fabric technique for this bunny. As I told Erin, I'm useless with an iron but I made myself try it out and it was so simple! It took me longer to actually dig my iron out from the back of the closet than it did to make the transfer. And just in case you're wondering, by ironing the fabric to the transfer paper, you get a beautiful, clean cut when you use it with your dies.

I am absolutely hooked on this technique! The fabric is an absolute delight on this little bunny. It belonged to my grandmother so I find Miss Bobo Rabbit that much more endearing. I only had 2 minuscule swatches of it, too, which was just enough to make all the pieces of the bunny and then use it for a couple smaller details on a project you'll see later in this post.

The Tushie Pocket and card might just be my favorite things about this entire set (excluding, of course, the chance to create something extra special for my little ones).

I made the card using just basic white card stock and used the accompanying stamp set to identify this sweet thing. Her name is Bobo because if you ask Nemy what anyone's name is, she'll answer Bobo.

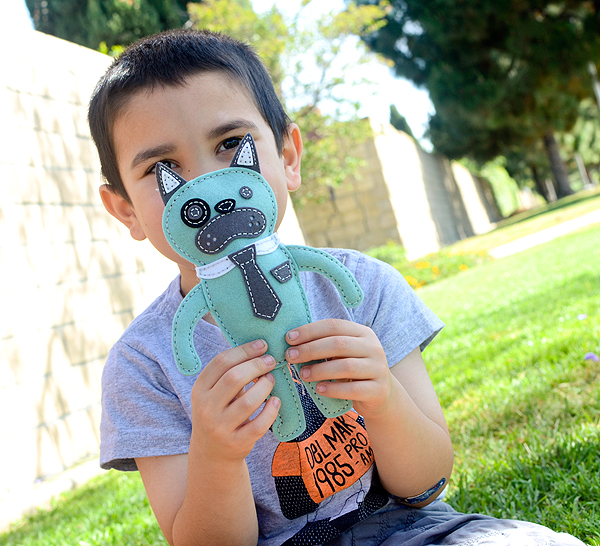
I finished Gus's puppy a couple of weeks ago and he's been begging me to play with it since then, but I kept saying, no, no, no! We have to wait for Nemy's to be done so we can have a photo shoot. When they finally got to actually play with these guys, they were so happy! (I know they don't look happy here, but that's because the landscapers were mowing the lawn at the park while we were trying to take photos and they were both very unnerved by that.)

I chose to make a bulldog for Gus because he misses our sweet American Bully Rudie who left us almost 2 years ago. It blows my mind all of the ways you can use these dies to make an infinite amount of different animals. I can't even wrap my brain around Erin's creative process at work here, but between the face and ear pieces, you can interchange, turn upside down, and stack them all to make--I swear--every kind of animal that exists.

And yes, in case you were wondering, these are a couple of grubby little kids who love to play outside so, when I photographed them with their Softies, it was dirty nails and all! This is real life, folks. (The other real life thing here is that I put the tie and collar on wrong! The collar pieces are sewn on OVER the tie! Duh!)

I have a thousand ideas about the different Softies I want to make, but I also have as many ideas for non-Softies I can't wait to create using this kit. From pillows to gift card holders to envelope labels...the possibilities are, again, limitless!

This set of pocket notes makes me squeal with excitement! They're just darling and, although I completely forgot to include the gift cards I got to tuck inside them, they are the perfect size for those. To make them, I simply stitched 2 pockets back to back, leaving the top open to slip the note inside. So easy!

I used the fabric technique again to make a small pouch for the front of the pocket and a couple of tags to perch in them. I used the oval patch die and cut it in half to create the pouch.


Again, I used white card stock for the note and the stamp set, plus coordinating inks. *A quick tip: I stitched around the rectangle at the top of the pocket before sewing the 2 pieces together. I did the same thing on the bunny pocket. If you sew them together, you close the pocket!


And here's a quick look at the patch die as an envelope label...I cut this out of adhesive sheets--another simple idea and just one more way to get the most out of this amazing kit!

Well, are you sold yet? If not, be sure to check out what the rest of the team has made...oh my, these ladies have amazing ideas!
I'm so happy you came by today! XO
All supplies from Papertrey Ink unless otherwise specified
All stamps and dies from Design-A-Softie Quick Stitch Kit (Available May 1st)
- Puppy -
Dies: Softie Dies, Softie Ears, Softie Expressions, Softie Collar & Tie,
Felt: Ocean Tides, Smokey Shadow, True Black, Vintage Cream
Embroidery Floss: white, light gray
- Bunny -
Dies: Softie Dies, Softie Ears, Softie Expressions, Softie Patches, Softie Exclusives
Felt: Harvest Gold, Melon Berry
Fabric: Vintage Floral
Embroidery Floss: melon (DMC 352), white
Ink: Melon Berry, Harvest Gold
Cardstock: Stamper's Select White
Bow: Dunne With Style
- Pocket Notes -
Dies: Softie Exclusives, Softie Patches
Felt: Aqua Mist, Spring Moss, Raspberry Fizz, Melon Berry
Embroidery Floss: melon (DMC 352), raspberry (DMC 956), aqua (DMC 964), white
Ink: Aqua Mist, Spring Moss, Raspberry Fizz, Melon Berry
Fabric: Vintage Floral and Jo-Ann stores
Cardstock: Stamper's Select White
Love the idea of incorporating your grandmother's fabric!
ReplyDeleteGreat post Rebecca. Love your designs and choice of colours.
ReplyDeleteGorgeous projects! I really love this new set!
ReplyDelete
ReplyDeleteLove the color combinations you used!
Ack!! I love your projects - so ingenious - and the tie thing? never would have guessed!
ReplyDeleteThey are adorable. Love seeing other ideas you have for the dies too.
ReplyDeleteNot sure how I missed your post but your projects are darling and so are your kids!
ReplyDeleteI love the pocket ideas!
Adorable!! I ordered my kit last night, along with some extra felt, and can't wait to start making mine!! Thanks for the sweet inspiration~
ReplyDeletethese are so colorful and fun.. love it all!
ReplyDeleteLove everything you made! Yes, I'm sold - can't wait to receive my kit!
ReplyDeleteLove everything you made! Yes, I'm sold - can't wait to receive my kit!
ReplyDeleteRebecca,
ReplyDeleteSuch cute and creative projects. Can't wait till my kit arrives.
On another topic, I just returned from Hawaii where I picked up a little keychain I would like to send to you. It reminded me of the James video. If you want to PM me on the PTI Forum I am kpenn1700. If you decide you want to I can send you my email and we can decide how to proceed. If you prefer not to I understand.
That's so kind of you, Kathleen--I would be honored to receive the keychain! I'm having a little trouble searching on the PTI forum this morning; would you mind sending me a quick email at thurstonpostblog@gmail.com and I'll reply back with my address? Thank you so much :)
Deleteinteresting art, very nice. I like it
ReplyDeleteI am happy to visit this article!
ReplyDelete