crate paper :: topping off large gifts
It's no secret that I love sprucing up little packages to give away. Small details are such fun--add a sequin here, a tiny tag there--they've become my favorite paper craft to produce. But what do you do when you have a larger gift to give? We can't always give jewelry and small notebooks...how do you present a statement-making present on a larger scale? It's easy!
The Confetti collection from Crate Paper and Maggie Holmes is all about parties and celebrations and features decor like garlands, oversized balloons, and large Paper Pinwheels. Nemy just turned 2 and I hung these up at her party, as is, without any added embellishments. When it was time to take them down, I wondered what else could be done with them...

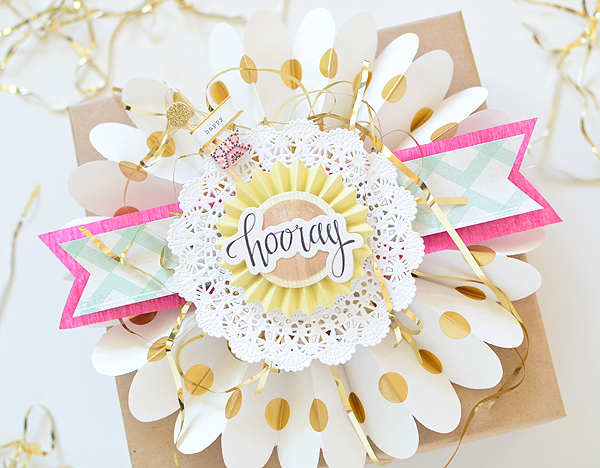
How about package toppers for large gifts? They make the perfect accessory actually--they're festive, can be decorated, and are sized just right for big presents (I've used the 8" x 8" and 10" x 10" accents here).

Because of the 3-dimensional rosette look to these, you don't need to do much more to them. Yet I did want to add some extra touches and the easiest way to layer rosettes is to add more circular elements, which is why I chose paper doilies and another medallion from the pack of Standouts. I wanted this to be a statement piece, though, like nothing my recipient had ever before received. Gold strands of tinsel, paired with a ribbon of crepe and patterned paper offered color and shine. The 'hooray' and tinsel strands remind me of a New Year's Eve celebration popper, ready to POP and spread cheers of joy all around. That's just the idea I was hoping to convey for my recipient, too.

The last detail was this 'happy' toothpick flag--the sweetest finishing touch and another burst of color and flair.

Gift bags are incredibly handy for larger presents and these days they're widely available in beautiful designs. But if you want to personalize the wrap or bring in some handmade touches, these pinwheels go a long way!

This aqua rosette was a bit trickier to decorate because it's not flat in the center like the gold polka dot was. To navigate around that, I designed a cluster of embellishments, delicately placed. The blue medallion Standout sits right on the raised area in the middle, while a half doily is adhered just above it, and more tinsel is scrunched up and bunched up to create some height around the 'nub' so the rest of the elements aren't laying flat.
(*Tip: Even though most of these embellishments are adhesive backed, I used hot glue to secure each piece. Because the surface area isn't solid, I had to make certain that the pieces would hold firmly onto whatever they were stuck. Also, since this will be moved around in transit and it's a 'delicate flower', so to speak, I wanted to ensure it's stability and longevity.)

I couldn't resist making an enclosure card out of this "Happy Day" scrap from the 'Party' patterned paper. It really is a perfect match!

I purposely avoided putting a name or even an occasion on these decorations, the idea being that these are the kinds of things that are nice to re-use. This way, if I give it to my friend for her bridal shower, she has the freedom to use it again for a birthday or wedding; it has less of a chance of sitting in her closet until she needs it for a bridal shower.

While it's always a pleasure to fashion sweet little gifts, it can be just as fun to create larger packaging when the need arises. Big or little, a gorgeously wrapped gift is always appreciated--no matter what's in inside the box.
Gorgeous Rebecca! I always love the way you photograph everything!
ReplyDelete