papertrey ink :: quick stitch kits :: beaded holiday
Papertrey Ink's third Quick Stitch Kit will be released on September 1st and it is entitled "Beaded Holiday". This kit reminds us of days gone by. When women spent quiet evenings by the fire, doing handwork. A time when handmade was best. The basic holiday stitching shapes in Beaded Holiday can be used for so many different types of projects, everything from keepsake gift tags, to tree ornaments, to holiday garlands. Think gift card holders, holiday party favors and more! Erin even has you covered when it comes to decorating your holiday stitching projects. The clever beaded motif dies pre-cut all of your holes so the beading process is a snap and perfectly precise. Get your kit tomorrow night so you can get a head start on holiday projects!

Beaded Holiday Kit Contents:
Custom tote bag
Beaded Holiday: Mitten die collection
Beaded Holiday: Stocking die collection
Beaded Holiday: Star die
Beaded Holiday: Motifs die collection
Beaded Holiday: Garland die collection
Bead storage box (ten compartments)
6mm Bugle Beads, Silver
6mm Bugle Beads, White
3mm Seed Beads, Red
3mm Seed Beads, Chartreuse
3mm Seed Beads, Teal
3mm Seed Beads, Silver
8mm Cupped Sequins, Red
8mm Cupped Sequins, Chartreuse
8mm Cupped Sequins, Teal
8mm Cupped Sequins, Silver

It's that time of year when crafty companies are beginning their festive releases. While I always think that I'm in no mood for Christmas in August when our sizzling hot weather is only just beginning (at least the way these past few years have gone), I always end up getting pulled into the vortex of holiday spirit and generally stay there until January! So with the PTI Quick Stitch kits being my premiere holiday party for 2015, I'm wishing it was cold enough here to light candles and drink hot cocoa as I head down into a rabbit warren of holiday projects.

But shall we begin with something that is a bit less Christmas-y and ease our way into tinsel and glad tidings? I created these lacy star home decor pieces to take me from Christmas into the New Year. I stuffed them with a bit of poly-fill before stitching them up and also die cut a lace star for the front. {Tip: Placing a sheet of card stock in between my cutting plate and the lace helped give me a seamless cut.}

The idea here was to make these stars to give as tree ornaments or package toppers, and because they have mostly ambiguous sentiments, when Christmas is over, they can be kept on display all year. I was particularly fond of the 'dream big this year' and 'out with the old / in with the new' messages from the Happy New Year stamp set. So many of us have such big dreams and plans for a new year and these little stars can hang from or sit on a shelf as a reminder of those aspirations.

I stamped the sentiments on swatches of muslin and after some testing, found the more saturated inks worked best. Used here are Harvest Gold and Tropical Teal. I used 3 sequins from the embellishment kit to add extra details. (These could be a really cute idea for the 4th of July, too!)

Supplies: (All dies, felt, ink & stamps - Papertrey Ink)
Quick Stitch Kits: Star Die, Sequins
Felt: Aqua Mist, Melon Berry, Harvest Gold
Stamps: Happy New Year, Sparkle & Shine, 'Tis the Season Sentiments
Ink: Hawaiian Shores, Harvest Gold
Cream, eggplant embroidery floss (DMC), cream & purple lace, muslin, silver thread (Coats), metallic blue thread (Coats)
One thing I always love to do when I receive my QSK is look over all the contents and decide how else to use them. I think that's important with any kit or supply, for that matter, because they're more useful when you can do more with them, right? So the good news about September's QSK is that even though it's called Beaded Holiday, you don't have to save it just for holidays! You're also not obligated to only make a garland with the garland dies, nor must you save your sequins and beads for the delicate motif handwork (though you can if you'd like ;).

The star die is completely versatile because you can have stars at any time of the year; you've seen what I did with them, and if you prefer a more traditional holiday look, simply change the colors to red and green and switch to more festive sentiments. Aside from the star, the garland dies, in particular, have a plethora of uses. How about stitching the loops to ornaments or gift card holders to hand on the tree or a package? I even made little decorative bows with them.

Let's discuss the bows first--I've fallen so hard for bows lately, and everything is cuter with a bow on it, right? Especially at Christmas. So when I realized how easy it was to make a bow out of the garland dies, I made a bunch of them and used them everywhere! I'm not sure if Erin knew they could be turned into these beforehand or if this was a just a happy a-ha moment for me, but I consider it a huge bonus!

This is all you need to make some bows:
Shortest garland die
Longest garland die
Felt
Glue (I used Fabri-Tac by Beacon)
Optional: thread or embroidery floss, needle

Cut 2 short garland pieces and 1 long one.

Fold the long piece into an 'infinity' symbol. I made one loop on the top and a loop on the bottom. The reason I did it this way is so I could use the die cut holes as a guide to stitch them together. (Stitching is optional; you can also glue the ends to the middle.)


Next, take one of the shorter pieces and nest it under your bow loops. A dab of glue in the center keeps the two pieces together. (Note: Each end of the short pieces have stitching holes. I did NOT poke out the holes in these pieces, though you can if you'd like for added detail.)

Last, take the 2nd short piece and wrap it around the center of the bow, adhering it in place on the underside.

That's it! So easy, right? You can now make lots and lots of bows for lots and lots of pretty packages.

Bows do not have to be saved for holiday-only occasions, either!

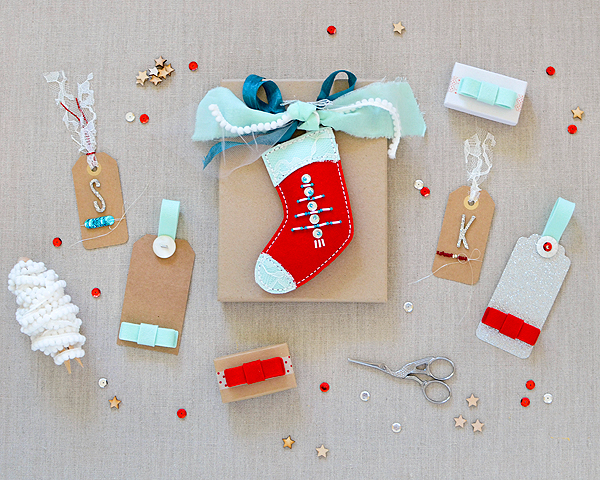
After the bows came the loop. You can stitch a loop to anything. I know that both the mitten and the stocking came with a cute loop die all their own, and you'll see a bit later that I did indeed use them. However, I also used the longest garland die to make a different loop for my stocking package topper.

I used the stitch guides on the ends to sew it into my stocking, lining it up with a few holes in the bottom of the cuff line. Because it was not made as a loop for the stocking, it won't fit seamlessly together, but it's firmly in place and since all the stitching is inside the stocking, it's unnoticeable on the outside. I can now tie it firmly to the bulky trims on my package and I know it's going to stay put!

I love using lots of different textures on my projects so I was happy to use the long garland die again to make felt loops for paper tags. These I glued in place with Fabric-Tac instead of stitching, though that is always another option. Instead of sewing, I covered the loop ends with buttons, sequins, and beads for the added bit of glitz.

I got a little carried away with the projects because I ended up using the sequins and beads for more tags--but I really wanted to stretch the kit and show you as many ways as possible to use all of the contents. Forgive me.


Supplies: (All dies & felt - Papertrey Ink)
Quick Stitch Kits: Garland Dies, Stocking Dies, sequins, beads
Felt: Pure Poppy, Aqua Mist, Vintage Cream, Spring Moss, Autumn Rose, Lavender Moon
Adhesive: Fabri-Tac (Beacon)
kraft & glitter tags (Michael's), white embroidery floss (DMC), silver thread (Coats), cream lace, aqua fabric, tulle, metallic red yarn & buttons (vintage), glitter Thickers (American Crafts), seam binding (Hug Snug)
Of course, I had to make some gift card holders, too! My love for wrapping gifts has surpassed my love for any other type of crafting (except maybe making tags), and I put making gift card holders in that category, as well. I'm always in search of all kinds of 'pockets' that will fit a gift card so the stocking and mitten absolutely HAD to be made into gift card holders! They are so easy to make, too!

I made these for my young nieces so I used slightly nontraditional colors, though I did manage to get the red and the green in there anyhow. I guess I got on kind of a lace kick with all of my projects because I used it again here on the cuffs and stocking toe. I was trying for a cohesive feel throughout the entire suite and mixing elements (like the lace and the bows), because I actually intend to use all of these pieces on my holiday gifts this year so if there are like elements on every piece, it's easier to mix and match when December arrives.

I opted for a simple beading pattern on my mitten, using the silver sequins and teal beads. The pop of Autumn Rose against the Spring Moss and Aqua Mist is so feminine and cute for a little girl. And, well, that bow!

Supplies: (All dies & felt - Papertrey Ink)
Quick Stitch Kits: Mitten Dies, Stocking Dies, Garland Dies, Motifs Dies..., sequins, beads
Felt: Spring Moss, Tropical Teal, Aqua Mist, Autumn Rose, Vintage Cream, Pure Poppy
White embroidery floss (DMC), cream lace
Don't forget, the kit goes on sale September 1st at 10pm EST. You can find all the details on Nichole's blog and please be sure to check out the rest of the gals and their gorgeous projects!

You are so creative! I love the lace stars!! And the bows!
ReplyDeleteToo cute.
ReplyDeleteBeautiful projects!
ReplyDeleteSo cute ♥.
ReplyDeleteLove how you added the lace! Wonderful projects! The bows are adorable!
ReplyDeleteSo sweet! Love all your photos!
ReplyDelete