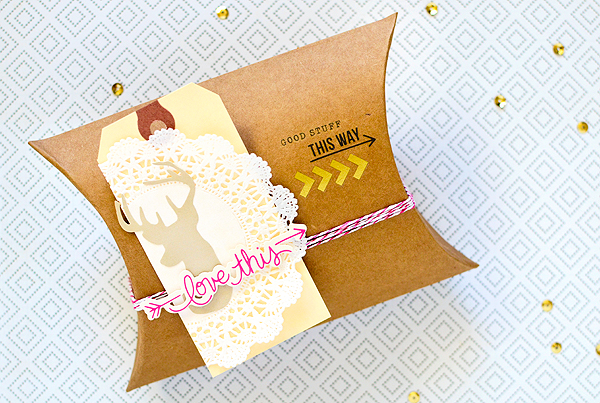
minimally made gift wrap ideas
Since most people start kicking their gift wrapping into high gear this month, I hope to bring you at least one new gift wrap idea per week from now until Christmas. Wrapping gifts has become one of my favorite ways to be crafty and I've already got some fun posts lined up over the next few weeks. I hope you'll join me!
The best way to take the stress out of gift-wrapping is to keep it simple. There's absolutely nothing wrong with folding up a nice sweater and putting it in a pretty gift bag if that's all you have time for. We are all running ragged these days managing a family or running a business or prepping for exams (or doing all three) so there's no shame in choosing to forgo extra fancy packages in favor of plain wrap. But if you simply must do that extra little "hand-crafted" touch (or people have come to expect awesome things from you because you've made a reputation for yourself as a wrapping queen), I've got a solution for you--and there's no wrapping paper involved!
I've gathered up a few items to get us started. To achieve the basics of this little project, all you need is a plain box and some rub-ons. Though any style of box you have on hand will do just fine, I picked up a pack of 6 small pillow boxes from Target for a mere $1.50. When assembled, they measure 6 5/16" (L) x 4 1/2" (W) x 1 9/10" (H). That's large enough for a pretty scarf, some jewelry, a bottle of cologne, or 6 Hot Wheels if, like me, you have a car-obsessed little guy.
I went a bit beyond the box & rub-ons (while remaining minimal), by adding some pink twine, gold glitter tape, and manila tags. For the purposes of this post, I created a matching set and gathered just a few extra supplies to decorate the tags. In keeping with the less-is-more theme, I made a rule that each tag could have no more than 3 embellishments. I chose the bright pink elements from Crate Paper's Notes & Things collection and paired them with dark wood and gold accents. The wood pieces come from all the way back to last Fall's Close Knit.
After making my tags, I took a close look at the rub-ons from N&T. They are full of cute sayings and if you play around a little bit, you can cut and paste them together to suit your needs. I really wanted to make the boxes appealing by creating a little excitement about the contents inside. Phrases like, Good Stuff, Love this, and Oh my goodness were exactly what I needed.
If you add some directional symbols pointing toward the box opening, you'll direct your recipient to a fun surprise! This L-shaped arrow, for instance, curves down over the side and lets them know that whatever lies inside is surely *the cutest thing ever!
If using a pillow box as I've done, keep it flattened while you apply your rub-ons. (This kind of box is really nice to use since it is flat and you can exert as much pressure as needed when applying your rub-on.) I trimmed the phrases I wanted to use from the full sheet and also trimmed off the white backing with it. This helps when messing about with placement, otherwise they may stick to your surface before you are ready to use them. For this box, I liked GOOD STUFF ---> THIS WAY with the arrows pointing right. I also chose the brackets from a set of Styleboard rub-ons for a pop of gold.
I transferred all of my words onto the box with the provided popsicle stick and assembled my box. Alas, the "--->" did not survive the move! But that's okay; it happens. I still like the way it turned out. I actually like it as-is, too--without the twine and the tag. (Note to self: This would make for some really cool branding/packaging...Hmm...)
I actually made these packages with birthdays in mind, but it's great for holiday wrapping, too. Since there is no added bulk, it is especially convenient if you have to travel with or mail your gifts. (You can either skip the tag or attach it later.) And if you switch out the pink details for red ones on this package in particular, it's all ready for Christmas.
So, now that you've got a few ideas for some super-simple gift wrap, will you be giving it a try this year?
Thanks for checking in! I'll be back next week with another fun gift wrap idea.
(And I still have a post yet to come about the first anniversary of my mother's passing...I got a bit carried away while I was writing it last weekend and need to decide what to do with it. It's getting pretty long and is moving in a couple different directions so I may split it up into 2 posts.)
Have a fantastic Friday!


super beautiful Rebecca!
ReplyDeleteLovely lovely little boxes! Great idea. Such a fun way to dress up a little gift.
ReplyDelete