papertrey ink stamp-a-faire 2017
I'm so excited to be participating in Papertrey Ink's Stamp-a-faire 2017! Join us for a weekend full of inspiring projects, video tutorials, challenges, and prizes! It's all online, it's all free of charge, and it's all crafty!!
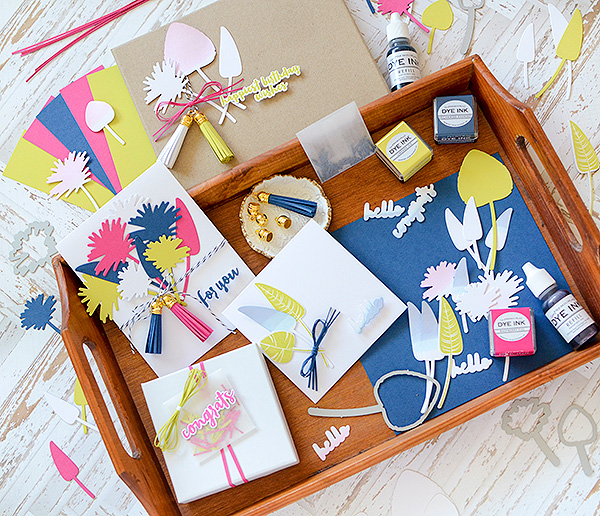
With this being PTI's 10th anniversary, the theme this year is traditional anniversary gifts. I got PAPER, which is the traditional gift for the first anniversary. You probably know I love to gift wrap, and if you know that, then you know I love all kinds of texture and fabrics and pretty trims like lace and tulle. I challenged myself to step away from that comfort zone and create projects that are made using 90% paper. (Note: You can see my SAF post here.)


It actually turned out to be pretty fun and I also decided to make my own embellishments. So I've taken some of my favorite gift toppers--tassels, bows, and confetti envelopes--that I normally make out of any material other than paper, and created them using cardstock. I've also got a little paper-dyeing going on, too, which offers a textural look.

And, I made a video! I know they're all the rage now with so many crafters having YouTube channels, and even my 6 year old thinks he should be a YouTube star (and to that I say, NO WAY, Gus!). For me, videos are a lot of work; I'm a little slow in picking up the knack for making them :) They definitely challenge me, but again, get me out of my comfort zone, so that's not a bad thing. You can see my video, a complete supply list, and instructions for making the paper embellishments on Nichole Heady's blog:

After I made the embellishments, I wanted to show you a few examples for incorporating them into your projects, so also in the video, I'm sharing 2 gifts. After all of that, the video was getting fairly long, and with Papertrey sharing 20+ projects and challenges throughout the entire weekend, I saved 2 cards to share exclusively on my blog.


The first is a card that features dyed shapes and a paper strip bow. I've provided written instructions for creating each embellishment, but you'll definitely want to check out my video on Nichole's blog for the in-person tutorials of the embellishments.

To dye the leaf + 'hello' die cuts:
Supplies: PTI Ink Refill, 1 cup boiling water per ink color,
cardstock or watercolor paper, PTI Tropics Dies
Pour 1 cup boiling water into a bowl, add 4-6 drops of ink
refill (less for lighter shades, more for darker); stir well
Submerge die cut into colored water; hold for 30-60
seconds (*for an ombre effect, only partially dip the shape in color)
Let dry
To make the bows:
Supplies: Cardstock, glue
Cut several thin strips of card stock (roughly 1-2mm x 8”)
Gather and line up strips (I used 3 for each bow I made)
Hold bundle with thumb in the center; fold over one end to
make a loop, then make another loop by folding over the opposite end
Wind another thin paper strip around the midsection of the
bow, about 3 times, then glue into place; trim excess
Round the bow loops with your fingers, and mold bow ends
into place until you achieve your ideal bow
*PLEASE NOTE: In my SAF post on Nichole's blog, as well as in my video, I have mistakenly written and said 1-2 centimeters for the paper strips when I meant 1-2 millimeters!*
The other die cut leaves on this card have been stamped with coordinating Tropics stamps and Limeade Ice ink. Then I simply adhered each element to the card with foam or glue dots. It's very simple but still offers lots of depth and dimension.

The second card features many Tropics leaf die cuts again, this time simply cut from PTI cardstock in Limeade Ice, Enchanted Evening, Raspberry Fizz, and White. The handmade embellishments this time are the fringe tassels. While I almost always use tassels somewhere on my projects these days, they are normally made from skeins of embroidery floss. But I love that you can simply make these with scissors and cardstock and a tassel cap.

Refer to the video for the "live" tutorial, or follow the instructions below to create your own.
Supplies: Cardstock, scissors, liquid glue, 4mm tassel caps
Trim 1.75” x 4” length of cardstock for longer tassel (pink); 1.5" x 4" for shorter (blue)
Using scissors, “fringe” cut the length of the cardstock,
leaving .25” uncut at top
When all cuts have been made, begin at one end and tightly
roll paper lengthwise
Apply liquid glue to the inside of a tassel cap (I used Fabri-Tac, but hot glue will work, as well)
Insert cap over top (uncut portion) of rolled tassel; let dry
Insert cap over top (uncut portion) of rolled tassel; let dry
I created a bouquet with the die cut leaves, adhering them to the card base. I also die cut 'for you' from the Tropics sentiments set, and stamped the coordinating words in Enchanted Evening ink. They are attached to the card with foam dots.

To secure the tassels, I used black baker's twine, wrapping it around the card front twice, then tying off the tassels with a bow. Quick, easy, handmade--you can't beat that, can you?

Along with my post and projects, there are so many other amazing designers taking part in Stamp-a-faire this weekend. You'll see some favorite PTI team members, as well as some extra special guests that you won't want to miss! I'll be hanging out in the PTI SAF forum, as well, for a little while, probably around 5:30/6:00pm EST today, so hopefully I'll catch some of you there.
Enjoy the weekend and get crafty!!
Supply List
. . . . . . . . . . . . . . . . . . . . . . . . . . . . . . . .
. . . . . .
>>>> Papertrey Ink <<<<
stamps: Tropics
dies: Tropics, Tropics Sentiments
>>>> Other <<<<
Scissors
Glassine
Envelopes (2”x2”)
Boiling
Water
Liquid
Glue (Fabri-Tac or Hot Glue)
Baker’s
Twine (Black)
Thread
(Optional)
Gift
Boxes
Comments
Post a Comment
i do appreciate your comment!
~Rebecca